Sewing machine tension can make or break your stitches. Whether you’re noticing loops, puckering, or uneven threads, tension issues are one of the most common sewing machine problems—but they don’t have to be intimidating. In this complete guide, we’ll walk you through how to fix sewing tension, from adjusting top thread tension to correcting bobbin tension, with clear step-by-step instructions, visuals, and troubleshooting tips for beginners and hobbyists.
Table of Contents
Why Sewing Machine Tension Matters
If your stitches are loose, tight, or just plain messy, it’s almost always a tension problem.
Tension refers to how tightly the upper and lower threads are pulled when forming a stitch. Get it right, and you’ll have strong, balanced, beautiful seams. Get it wrong, and you may face thread bunching, skipped stitches, or broken threads.
Common Signs of Sewing Tension Issues
- Uneven stitches on top or bottom
- Loops pulling through to either side of the fabric
- Thread breakage or nests of thread underneath
Many sewers—especially beginners—assume their machine is broken. In truth, most issues are fixable in minutes if you understand how to check thread tension settings. Before diving into sewing machine tension adjustments, it’s helpful to understand the basic parts of a sewing machine and how to use it properly.
By the end of this guide, you’ll know how to confidently adjust both top and bobbin tension, troubleshoot issues, and achieve stitch perfection every time.
Understanding Top Thread Tension: Your Primary Control
Your top thread tension is controlled by a numbered dial on your sewing machine, usually between settings 0 and 9. Inside the machine, the thread passes between tension discs that press together with varying force, depending on the dial setting.
Anatomy of Top Thread Tension
- Tension Dial: Found on the front or top of your machine, typically numbered.
- Tension Discs: Inside the machine, hidden behind the dial.
- Take-Up Lever: Helps maintain thread flow and tension rhythm.
How the Presser Foot Affects Tension
Pro Tip: Always thread your machine with the presser foot UP. Why? Because lowering the presser foot engages the tension discs. If the foot is down while threading, the thread won’t slide between the discs properly, giving the illusion of correct tension even when it’s not.
What’s the Default Sewing Machine Tension Setting?
For most basic sewing, the default top tension is around 4 or 5 on most modern machines. This works well for medium-weight fabrics and all-purpose thread. But depending on your fabric or thread, adjustments might be necessary.
🔍 Pro Tip: Always test on a fabric scrap before sewing your actual project.
Balancing Tension: Stitch Harmony Explained
The key to perfect stitching is a balance between the top and bobbin threads. Each thread should pull just enough—not too tight or loose—to meet in the middle of your fabric layers. This is called perfect stitch balance.
Signs of Perfect Tension
- The top and bobbin threads lock exactly in the fabric’s middle
- No loops on either side of the fabric
- Even symmetrical stitches front and back
When to Adjust Top Tension
- Using thick fabric (e.g., denim or canvas): Try increasing top tension slightly.
- Sewing fine or sheer fabrics: Reduce top tension to prevent puckering.
- Different thread weights: Heavier threads may require tension adjustment.
Factors That Affect Stitch Tension
- Fabric type & thickness
- Thread weight and fiber (cotton, polyester, silk)
- Needle size and type
- Bobbin thread weight
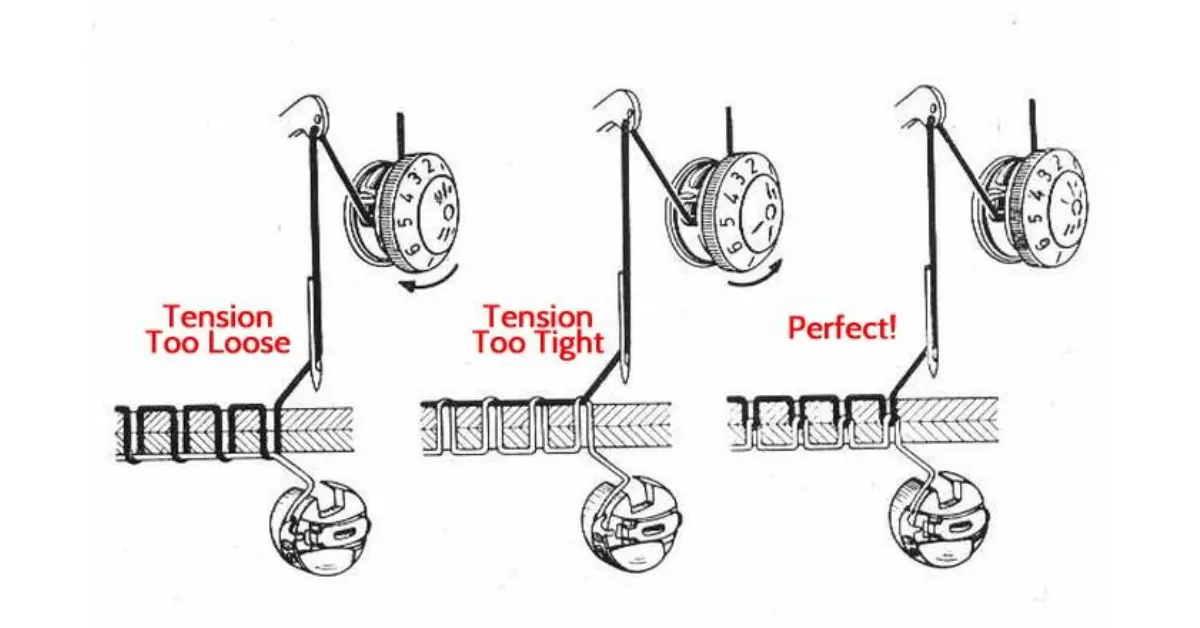
4. Tension Troubleshooting: A Visual Guide
One of the easiest ways to diagnose tension problems is by using the Two-Color Thread Test. Load your machine with one color thread in the top and a different color in the bobbin.
Then inspect sample stitches and troubleshoot based on what you see:
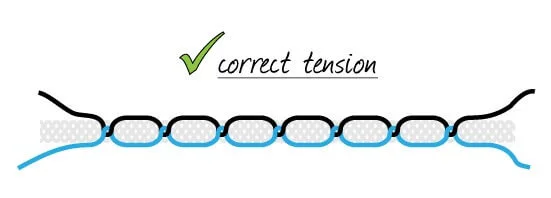
Perfect Sewing Machine Tension: The Ideal Stitch
- The top thread shows only on top
- Bobbin thread shows only on the bottom
- Threads meet neatly halfway in the fabric
Top Tension Too Loose (or Bobbin Too Tight)
- Top thread loops pulled to the underside
- Loose stitches when gently tugged

Fix: Increase top thread tension a little at a time (e.g., from 4 to 5). Test after each change.
Top Tension Too Tight (or Bobbin Too Loose)
- Bobbin thread showing or “railroading” on top
- Puckering in stitches
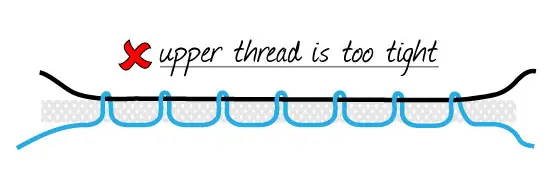
Fix: Decrease top thread tension slowly (e.g., from 5 to 4). Consider checking bobbin tension, too.
Bobbin Tension Adjustment Made Easy
While top tension adjustments fix most problems, sometimes the bobbin tension needs attention, especially with older mechanical machines or specialty projects.
Types of Bobbin Cases
- Drop-in bobbin (horizontal): Built-in tension, rarely user-adjusted
- Front-load bobbin (vertical case): Has a visible tension screw you can modify
The “Bobbin Drop” Test
Test bobbin tension by holding the bobbin thread and gently jerking the bobbin case:
- If it drops easily: Tension is too loose
- If it doesn’t drop at all: Tension is too tight
- If it dangles about 2–4 inches before dropping: Just right
How to Adjust Bobbin Tension
- Locate the small tension screw on the bobbin case.
- Turn clockwise to tighten the tension.
- Turn counterclockwise to loosen.
- Only adjust in 1/8 turns—tiny changes make big differences.
🚨 Caution: Mark your original setting with nail polish, tape, or a photo in case you need to return to it.
Advanced Tension Tips for Creative Sewing
Many intermediate and advanced sewists intentionally alter tension for specific effects, including:
Free-Motion Quilting
Requires looser top tension for smooth thread flow and artistic shapes.
Embroidery & Metallic Threads
- Use lower top tension to prevent thread breakage.
- Consider bobbin thread weight adjustments for balanced fill.
Common Non-Tension Causes of Tension Problems
Sometimes, a tension issue isn’t tension at all.
✅ Checklist:
- Correct threading path followed?
- Presser foot UP when threading?
- Machine cleaned and lint-free?
- The right needle for fabric?
- Same weight threads top and bottom?
Even high-end machines struggle without routine maintenance. Regular cleaning and oiling prevent many false “tension” issues. For detailed maintenance instructions, see our guide on how to oil a sewing machine.
Conclusion – Sew with Confidence
Mastering sewing machine tension is one of the most valuable skills for any sewist. Understanding how your top and bobbin threads interact enables you to troubleshoot issues, prevent frustration, and achieve perfect seams—whether you’re stitching clothes, quilts, or crafts.
🧷 Key Takeaways:
- Start with the top thread tension dial and test incrementally.
- Use the two-color test to visually spot issues.
- Adjust bobbin tension only as needed and carefully.
- Rule out common threading or needle issues first.
If you’re just starting out, you might also find our guides on the Best Sewing Machine helpful for selecting the right machine.
🙋 Share Your Progress!
Did this guide help you fix your sewing machine tension issues? Got before/after stitch pics? Tag us on social media or leave a comment with your success story—and let’s celebrate your clean, balanced stitches!
❤️ If you found this helpful, consider sharing it with your sewing circle or linking back to help others learn!